After spending most of my academic and professional career in the world of image and photograph processing, I became obsessed with improving the quality of photographs via a set of enhancement techniques. The result is that I literally get upset whenever I look at a friend's photos that were taken using a digital camera. I always point out the fact that if those photos get enhanced they will look so much better - I will repeat that over and over again if the photo has already been framed! Photo enhancement, or re-touching, makes a world of difference.
I also get nervous whenever I hear the prices that professional photographers ask to lend their services. Yes, some professional photographers are true artists, but those usually work for magazines and don't need to take on gigs like your wedding (unless they're starving - they may be starving artists!). Asking for $2,000, $5000, or even $10,000 for a day's worth of picture taking is, in all honestly, utterly ridiculous!
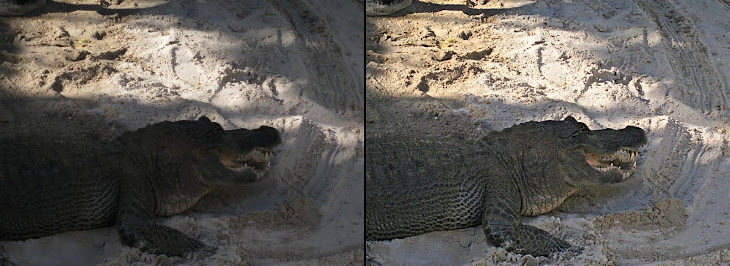
In my opinion, what makes the biggest difference between the pictures you take using your $200 digital camera - or even better an SLR camera - and the ones a professional photographer would take, is the post-processing. In other words, the photo enhancement that is done after the picture is taken is what makes it look 'professional'. In fact, a significant amount of work that professional photographers do is re-touch (enhance) their photographs.
Now, it is true that some photos can't get that much better, with the biggest problem being that they are taken under low-light conditions (e.g. during the night). Then, noise really becomes an issue when trying to enhance them. The only way to improve those photos is to use a camera with a larger area-per-pixel specification (more expensive), for example, an SLR camera. In Digital Camera Advice I explain how you can get better low-light performance without paying extra (in fact you may be paying less) and without sacrificing image quality. Nevertheless, the vast majority of digital photos that are out there are not taken under low-light conditions so you can probably do without paying the extra cash.
We all have digital photographs that we wish were taken by a professional. Those are the ones that bring up precious memories, people, and places. It may even be an image you uploaded to your website, your facebook page, or, alas, the photo you used for your online dating service profile.
You don't have to have a Ph.D. to make your photographs look like they were taken by a pro. You can enhance your photos by simply following the instructions that I include in this blog. Those can be found in Instructions to Enhance your Photos. You can use any of the free Photo Editors (no installation or registration required) that I mention in Free Photo Editors. You'll see that it's amazing what a difference a few simple steps make!
I also get nervous whenever I hear the prices that professional photographers ask to lend their services. Yes, some professional photographers are true artists, but those usually work for magazines and don't need to take on gigs like your wedding (unless they're starving - they may be starving artists!). Asking for $2,000, $5000, or even $10,000 for a day's worth of picture taking is, in all honestly, utterly ridiculous!
In my opinion, what makes the biggest difference between the pictures you take using your $200 digital camera - or even better an SLR camera - and the ones a professional photographer would take, is the post-processing. In other words, the photo enhancement that is done after the picture is taken is what makes it look 'professional'. In fact, a significant amount of work that professional photographers do is re-touch (enhance) their photographs.
Now, it is true that some photos can't get that much better, with the biggest problem being that they are taken under low-light conditions (e.g. during the night). Then, noise really becomes an issue when trying to enhance them. The only way to improve those photos is to use a camera with a larger area-per-pixel specification (more expensive), for example, an SLR camera. In Digital Camera Advice I explain how you can get better low-light performance without paying extra (in fact you may be paying less) and without sacrificing image quality. Nevertheless, the vast majority of digital photos that are out there are not taken under low-light conditions so you can probably do without paying the extra cash.
We all have digital photographs that we wish were taken by a professional. Those are the ones that bring up precious memories, people, and places. It may even be an image you uploaded to your website, your facebook page, or, alas, the photo you used for your online dating service profile.
You don't have to have a Ph.D. to make your photographs look like they were taken by a pro. You can enhance your photos by simply following the instructions that I include in this blog. Those can be found in Instructions to Enhance your Photos. You can use any of the free Photo Editors (no installation or registration required) that I mention in Free Photo Editors. You'll see that it's amazing what a difference a few simple steps make!


